- 4 or 5 backs off of notebooks
- Ruler that goes up to 12 inches(30cm)
- Scissors
- Glue
- Polyester or cotton stuffing
- Medium-large piece of fabric in your choice of color
- Paper (about 10-15 sheets)
- Tape
- Needle
- Thread
Tear or cut the backs off of your notebooks. This cardboard will later become the base of our mattress. Measure and cut out 2 pieces of cardboard that are 11"x4", 2 pieces that are 11"x2", and 2 pieces that are 4"x2". Take an 11"x4" and lay it down.
Step 2: Tape both of the 4"x2" pieces on the short sides of the 11"x4".

Step 3: Next, tape the other 11"x4" on top of the 2 4"x2".

Step 4: Now tape ONE of the 11"x2" on either one of the remaining sides. It doesn't matter which side you put it on.

Step 5: Crumple up the paper and stuff it inside the box. (Haha, yes, those weird red things are pieces of paper.) stuff the box full, but don't let it bulge. If you need to, crumple the paper even tighter and then put it in.

Step 6: Tape the remaining piece of cardboard on the last side. Make sure everything is sturdy.
Step 7: Glue your cotton to your little cardboard box. Make sure that there are no big lumps or dips when you are done gluing.
Step 8: Place your fabric over your mattress. Gather it at the bottom to get an idea of the finished product. Put stick pins in the place you wish to sew. Unfortunately, you have to hand sew for this.
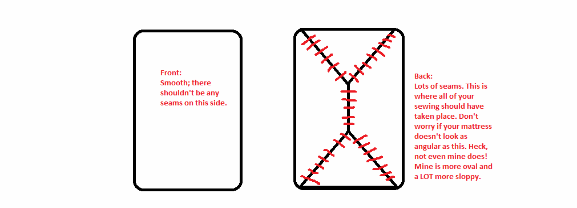
Step 9: Sew like this:

Step 4: Now tape ONE of the 11"x2" on either one of the remaining sides. It doesn't matter which side you put it on.
Step 5: Crumple up the paper and stuff it inside the box. (Haha, yes, those weird red things are pieces of paper.) stuff the box full, but don't let it bulge. If you need to, crumple the paper even tighter and then put it in.

Step 6: Tape the remaining piece of cardboard on the last side. Make sure everything is sturdy.
Step 7: Glue your cotton to your little cardboard box. Make sure that there are no big lumps or dips when you are done gluing.
Step 8: Place your fabric over your mattress. Gather it at the bottom to get an idea of the finished product. Put stick pins in the place you wish to sew. Unfortunately, you have to hand sew for this.
Step 9: Sew like this:
Step 10: Cut off the fabric as described in the figure above. Sew the extra fabric, like you just sewed the main area. (The main area is the area where you are directed to sew in the figure above.)
Step 11: Fold the sewn extra fabric onto the main area. Sew the extra fabric to the main area. Do this for both sides.
Step 12. When done, you should look like this:
If it didn't turn out exact, DON'T WORRY! As long as you are satisfied, that's all that matters.
Thanks for reading! Unfortunately, I have NO IDEA how to make a bed frame! D: If anyone knows just a basic, cookie-cutter way to make a bed frame, PLEASE COMMENT!! Thanks again, and see you soon!
Nifty idea, good job~!
ReplyDelete~Brea